miércoles, 15 de mayo de 2019

Mini Album "Mi princesa"

mayo 15, 2019 6 Comments
Hello, dears!
Today I gonna show you this little mini album for a little princess.
Yes, it's a bit small (14x20cm) but I think this measure gives a lovely touch.
Pink is the predominant color in all its shades with a little golden glitter.
The fabric has a nice floral pattern and I added some ruffles at the end
The inscription means "Mi little princess" ("Mi pequeña princesa" in Spanish)
When I was a little girl I didn't like princess theme or pink color but now 
that I'm older I find it lovely for a girl... Things change!
I decorated the cover with some diecuts, pearls and sackcloth roses.

And these laces have me in love!
I didn't take photos of the inside (my mistake!) but I can show you the video.
And this was my new mini album!
I hope you liked it!
Thanks for see.

With this mini album I participate into the following challenges:

ЧИПБОРД+КРУЖЕВО 

тему + надпись


sábado, 11 de mayo de 2019

Card "Dream"

mayo 11, 2019 10 Comments
Hello everyone!
This is one of my seasons of the year: spring!
At last the rain left us here in Spain and, although it is still spring, finally temperatures rise! 
So I decided to combine both elements in this card: a bird and delicate flowers for a soft spring 
and a single hard colored flower like the typical summer flowers here. 
A rare combination but I'm used to seeing it in my garden :)
So I hope you like it!

With this card I participate into the following challenges:

ОЭ цветы + цвет-белый + листья

ОЭ птица, надпись

miércoles, 8 de mayo de 2019

LO "Beyond the Sea"

mayo 08, 2019 8 Comments
Hello everyone!
Today I gonna show you this LO that I've create using "Sea Time" collection.

When my mother was young she and her best friend took a walk on the beaches of Barcelona.
There're always many boats docked at the seaport 
and they took some photos with these.
Many years have passed since then but thanks to the photos she can remember these days 
and tell me about her trips and excursions.
So this was my turn to preserve her memories on this LO so summery!
So I decided to use "Nautical Chart" as a base paper for this LO.
I think that paper is in line with the theme of the photos.
I chose to decorate the background with a bubbles stencil, gesso and paintings.
I gave the last touches with this little stamp of stars and a mix of gel medium, beach sand and stars sequins.
And, of course, don't could miss a few sailor elements, including real little shells or this lovely flowers 
by Freetany Flowers, 48 Little boy-2.
So this is the end.
This is the start of my summer projects I think!
See you!

With this LO I participate into the following challenges:

МАЙ 2019

Завдання травня

miércoles, 24 de abril de 2019

Photobox (Tutorial)

abril 24, 2019 18 Comments
Hi everyone!
Today I wanna show you how to do this cute photobox inspired by Tatiana Shargorodskaya mini album, such amazing cute thing. If you like, please, take a look to her works.
(Tutorial en Español aquí)
Supplies:
-Kraft cardstock (300gr)
-Cardboard (1'5mm)
-Some papers from "Princess Garden" collection
-Tools for cutting, folding and gluing
-Different embellishments like flowers, chipboards, die cuts ...
-1 Knocker and 4 legs

Let's start!
For make the box you need two cardstock pieces with the measurements of the image and one piece of 9x18'5cm (3 9/16"x7 5/16") and four of 9x9'5cm (3 9/16"x3 3/4") for make the pages of the mini album.
Score the cardbord "A" at 10'8cm, 21'6cm, 24'6cm and 35'4cm (4 1/4", 8 1/2", 9 11/16", 13 15/16"); and cardstock "B" at 10'8cm, 21'6cm, 31'1cm and 41'9cm (4 1/4", 8 1/2", 12 1/4", 16 1/2"). Also score the cardstock of 9x18'5cm (3 9/16"x7 5/16") to 9cm and 9'5cm (3 9/16" y 3 3/4") and the other four to 0'5cm (3/16").
Box
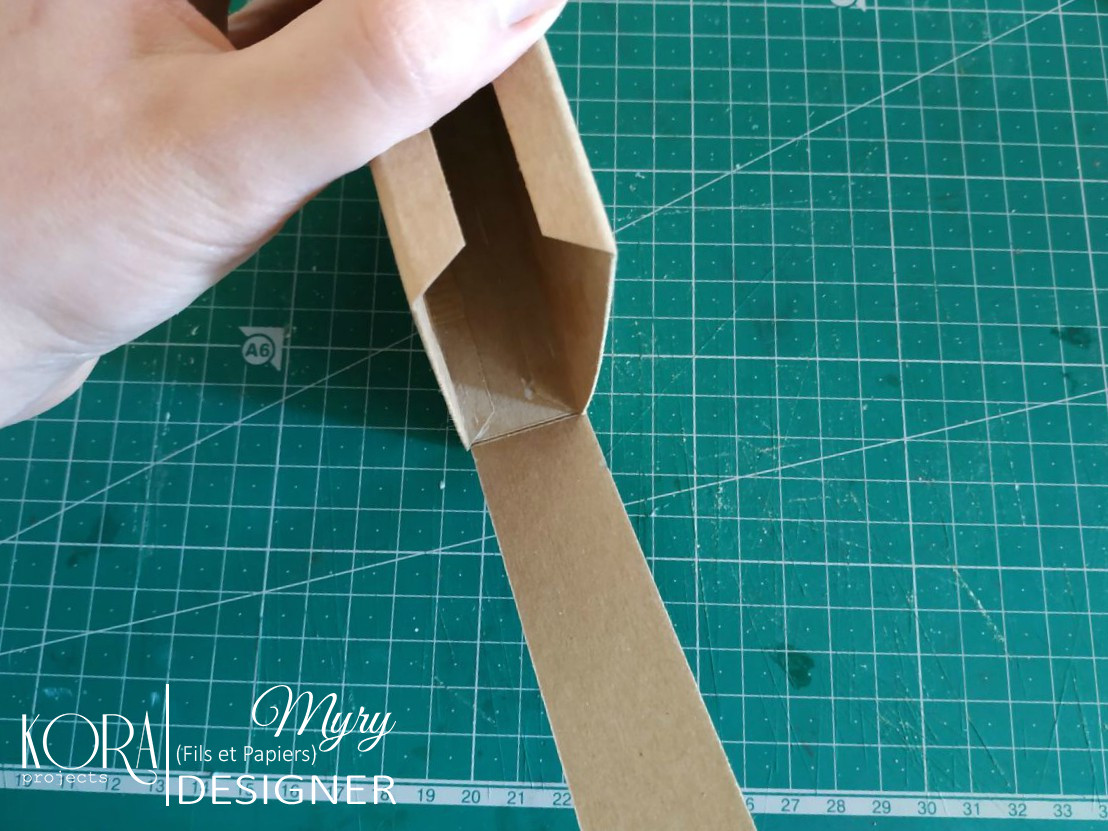
Start the assembly gluing the cardstock "A" like:
  
Next glue the central part of the cardstock "B" in this way:
And continue gluing the strip.
  
  
Top-Spine
You need a 4x10'5cm (1 5/8"x4 1/8") piece of cardboard and two of 2'8x9'3cm (1 1/8"x3 5/8"), glue these together. Cut two pieces of 6x12'5cm (2 3/8"x4 15/16") scrap paper for cover them.

  
Put the knob in the center of the large piece. The back will be covered with the other piece but you can cover it with a 4x10'4cm (1 5/8"x4 1/16") piece of scrap paper.
Decorate the sheets before glue them to the spine. If you are going to use elements with volume, remember that between sheets there are a space of 0'5cm (3/16").
Center the five pages on the small piece. 
First glue the double page and then two pages on each side.
  
  
Frames
You need two pieces of scrap paper with this measures:
You can decorate the frame with some die-cut or molding.
Cut two pieces of acetate the size of the frame to protect the photos.
Cut some pieces of scrap paper (0'2mm / 1/16 " smaller), use texture paste and paint... for cover the box.
  
I used some ephemera from the "Princess Garden" collection and these chipboards:
 
And that's how look this photobox.
I hope you liked it and I encourage you to do this cuteness.
See you!

With this mini album I participate into the following challenges:

#90 "Anything Goes"

Craftyhazelnut's Patterned Paper Challenge
"Anything Goes"
Country View Challenges
"Easter and/or Spring"


ОЭ (розовый + принт) + чипборд