Mostrando entradas con la etiqueta steampunk. Mostrar todas las entradas

lunes, 14 de junio de 2021

Steampunk Box

junio 14, 2021 2 Comments

 Hi everyone!

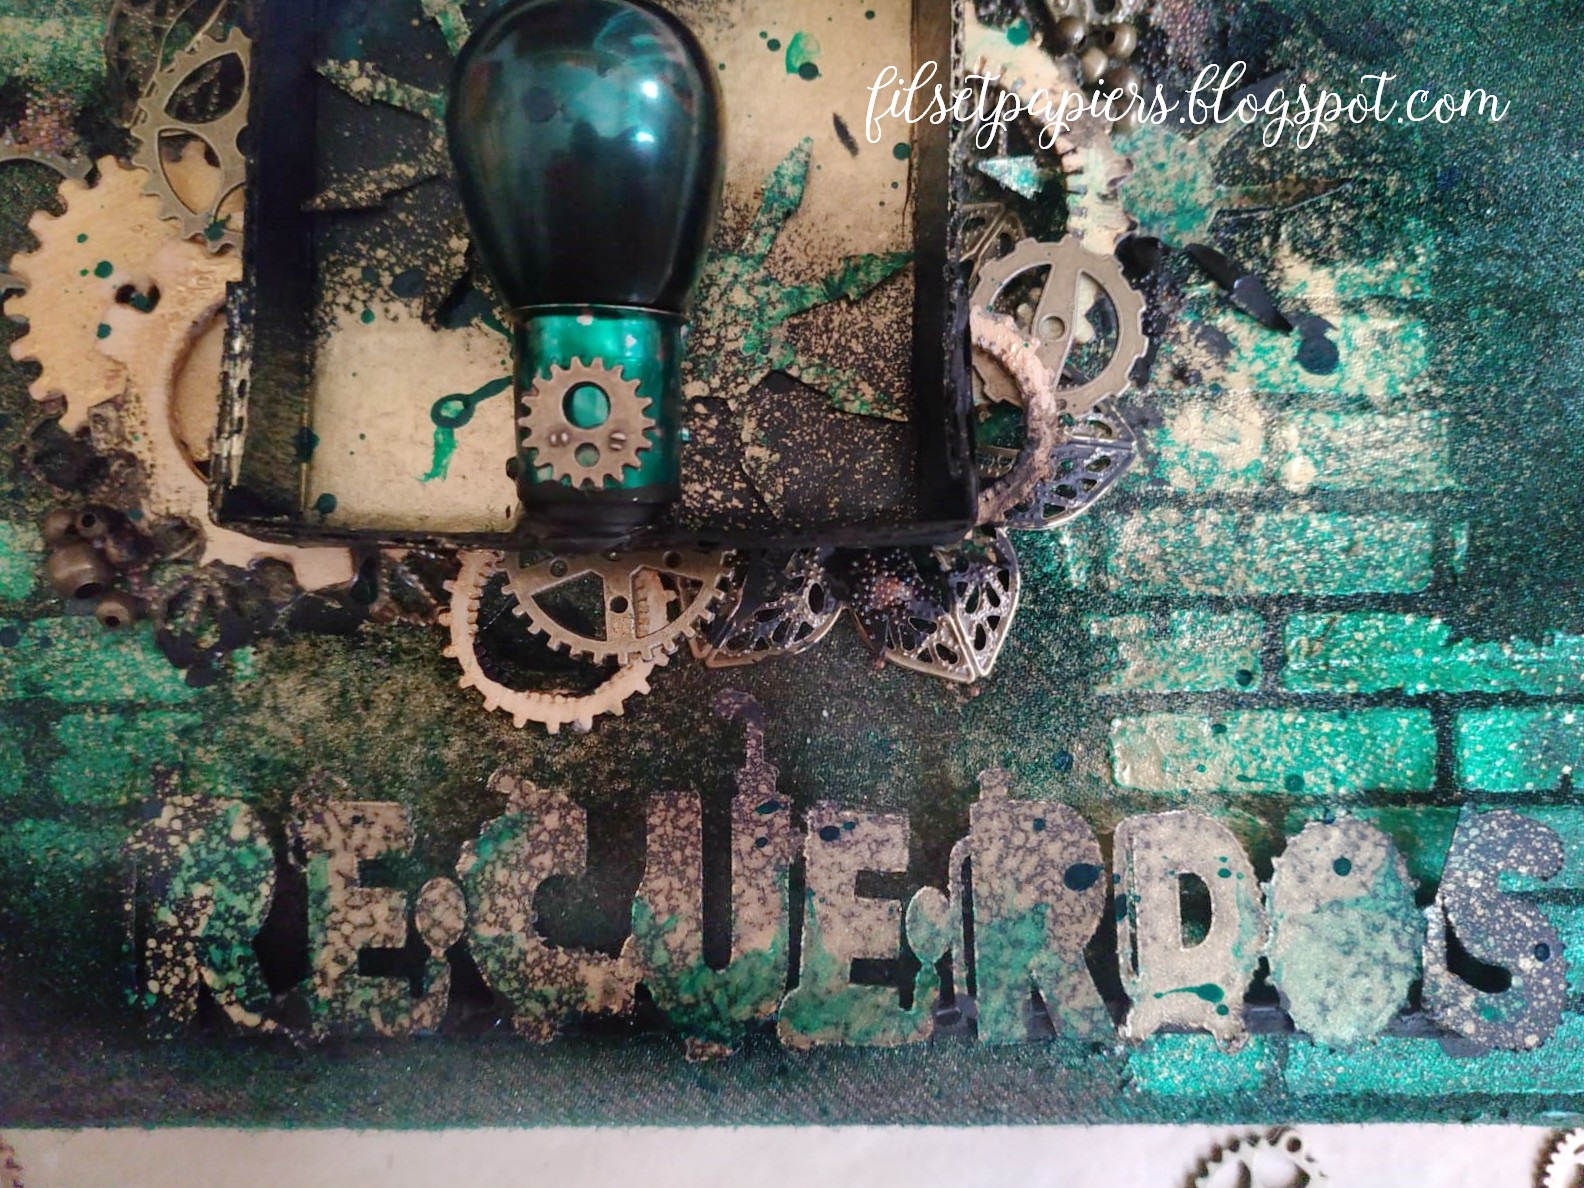
Today I gonna show you this stemapunk box.
I used a box that already had a beautiful metallic blue color: there is nothing like recycling!!
It was what I needed to make this box for keep old letters.
As a fan of the "steampunk-industrial" style I can say that "Age of Technology" is one of the best collections I've seen.
Look this deep blue with the hint of rust, is gorgeous!!
It's surprising how well combine the color palette, the oxides, and all the elements. Simply wonderful! 
And the greenish touches are spectacular!!
If you are a fan of this style you should take a look!


With this box I participate in the following challenges: 

viernes, 26 de julio de 2019

A different Frame

julio 26, 2019 4 Comments
Hello everyone!
Today is DIY's day!
I propose to do something different than usual with these wooden letters: its size gives for much!
(Tutorial en Español aquí)

You will need:
-2 alike letters. I'm going to use two M and two D to 30cm in height to make two frames
-glue
-cardboard
-supplies for cut, measure and write
-drill and 8mm tip
-mini hand drill and 3mm bur tip
 - sanding paper

Do not panic! Takes work but is very easy to do.
Let's start!

So first you need to draw two holes behind one of the two letters for can hang our frame on the wall,
in my case I'll draw the holes in one M and one D. The diametre of the holes need to be a little more big than the diameter of the nail head that we're going to use. I've made the marks to 6cm with a circle of 8mm in diameter and a straight line upwards of 5mm (1'3cm in total).

Avoid areas very close to edges or fragile structure parts when you are going to draw the holes.
I've used a support with a hole that matches the hole of my letter,
thus when I drilling there will be no obstacle to descend.
First make the circle...

... and make the straight line with the bur tip.

This takes some work and it's necessary to be careful. If you haven't practice go very slowly
or ask someone to help you. Once the line is made you can use the same tip to polish the edges
and then the sandpaper to fine-tune the details.
Make an structure with cardboard to superimpose the letters. I used the cardboard of the packaging. However, depending on what you are going to do, I recommend that you use something like balsa wood.


Do not forget to cover the holes after gluing letter in letter!

If you want to make a shelf you can make a board that goes from end to end.
And that's it!
For decor I used some photos, synthetic paint, flowers of the same colors, metal elements
and this gear set from Kora Projects.
The first thing I thought when I saw these letters was doing bookends. In the store you can find
two models: one of 10cm and this one of 30cm in height. I thought the big one will be perfect
because in my head those 30cm turned into 20cm. Don't ask how. When I saw the size of the letters was... well... The most ridiculous thing is that before ordering them I'd checked the measure with the meter!
So after a loooot of thinking I decided to make a different frame and this is the result.
Thanks to our DT Hilda who always encourages me to continue attempt to do mixed media projects.
And also the future owner of these two frames, which made me work with colors that it's not my cup of tea!
So I can only say: cheers! Do not despair when your project failure. Think and look for alternatives.
Go for it anyway!
Have a good summer!

With this project I participate into the following challenges:

ScrapMagia oe Маска\Трафарет + Акриловые краски

ALTERED ECLECTICS "ANYTHING GOES + MIXED MEDIA"

martes, 12 de marzo de 2019

"Lady Steampunk" Junk Journal

marzo 12, 2019 27 Comments
Hello everyone!
Today I gonna show you this Junk Journal that I made for a friend.   

She wanted something Steampunk but not very "heavy". That was a challenge for me because 
Steampunk is a "heavy" style. So I put all the elements on the cover and 
leave the inside practically empty so she can write a lot!

I used three pieces of chipboard for the cover, spine and back cover. 
With gesso, a brick stencil and acrylic black I embellished all these parts.
I used gears chipboard that I painted with acrylic black together with the other metal embellishments: 
Tim Holtz flowers, an old key and corners. To finish I used this metallic rose for contour all elements.
I used a black and red ink mix for tint the pages, envelopes... 
And "Tattered Time" paper collection for the inside and some pages.
And the video, of course.
What do you think about this?

With this Journal I participate in to the following challenges:
Crazy-Lab "Джанкбук"
Посиделки за скрапом №64 Механика любви
      

lunes, 20 de agosto de 2018

JV "Man's History" / СП "Мужская история" ENDS

agosto 20, 2018 6 Comments
¡Muy buenas!
Por fin mi primer álbum masculino está terminado
Всем привет!
завершается совместный проект "Мужская история"
♥ ╣ [-_ -] ╠ ♥

Os recuerdo que este era un JV (o reto lrgo) del blog Yaroslavl Scrap-Club.
Si no sabéis ruso pero queréis participar usad un traductor, preguntad en inglés, ¡imaginación! Pero valen mucho la pena, ¡así que ánimo!
Estas han sido todas las etapas del reto:
En esta entrada os quiero enseñar el álbum totalmente acabado.
A continuación el video y luego comentaré qué me ha gustado, qué no volvería a hacer, errores...
Es la primera vez que combino técnicas Mixed Media para hacer un mini de estilo Steampunk 
y he de decir que ha sido un reto en toda regla.
Si visteis las etapas del reto os habréis dado cuenta de que he cambiado cosas en el orden interno, he añadido decoración a la portada y he hecho las 4 páginas que me faltaban.


A tener en cuenta
1. El estilo Steampunk es complicado, sobre todo si no se tiene claro de qué va; es verdad que hay versiones del tema pero se suele confundir mucho con el estilo Industrial, y no son
lo mismo. Escoger una colección de papeles que sea 100% Steampunk a día de hoy es complicado (por no decir imposible); o son un poco vintage, o son un poco shabby, o son industrial (o una mezcla), o hay tal cacao que no puedes usar todas las páginas. La colección que yo he usado, "Tattered Time" de DCWV, me decepcionó al principio pero hay que admitir que es una mezcla muy lograda, de las que más recomiendo para este tipo de trabajos.
2. Mixed Media, algo complicado, no de hacer, sino de que quede bien. Yo soy muy ignorante sobre las técnicas y demás, así que he buscado inspiración por la red
y he intentado imitar los trabajos que más me han gustado.
3. Recomiendo lo mismo para crear la página en sí (donde va la foto/s, los adornos, bolsillos....). Usar bocetos o sketch suele ayudar; también puedes buscar un álbum ya acabado que te guste
y copiar la estructura interna.

A evitar ¡como la peste!
1. Si tus páginas van a tener mucho peso en estructura y/o decoración ¡por favor! no uses sobres. El peor error de tooooodo el álbum. Hay sobres que tiene un alto gramaje pero son caros
y difíciles de encontrar; deja los sobres para un álbum pequeño y "ligero", poco cargado.
Yo he tenido que pegar entre la página y la "hoja" del álbum una cartulina de 200gr para compensar. Y creo que me he quedado corta porque ya no es solo la decoración y las estructuras, estamos hablando de Mixed Media: pintura a too trapo.
2. No esperes a que sólo te falte pegar las páginas de las contraportadas (lo que sería la primera y la última); antes incluso de hacer la portada piensa bien en el tipo de cierre que quieres poner, no sea que luego te encuentres con el problema de que o deberías haberlo cosido antes (por ejemplo) o que ahora tienes que pegarlo de alguna manera complicada... problemas a evitar.
3. Una de las cosas que menos me gusta de los minis "de siempre" es que los encuentro de una inutilidad tremenda; me resulta muy difícil verlos como "álbums de fotos", ya sea por prejuicios o una idea preconcebida de cómo tiene que ser un álbum... A saber. Pero nunca quise hacer uno para mis fotos por ese motivo. Luego descubrí el estilo de scrapear de Europa del Este y fue como "prender la llama". Entonces, tema fotos. Recomiendo mucho pensar las estructuras de cada páginas teniendo ya las fotos delante, pero si es para regalar haciendo cada estructura lo más adaptable al tamaño de foto estándar posible (a no ser que ya sepas que es para un determinado tamaño). Es demasiado trabajo como para que luego no pueda usarse.

Y hasta aquí llega la experiencia.
Seguramente volveré a complicarme la vida con otro proyecto de este estilo porque me encanta, punto. 
(~ ¯ ▽ ¯) ~
¡Muchas gracias por legar hasta aquí!
Вот и все! Всем спасибо за внимание!

martes, 14 de agosto de 2018

JV "Man's History" 6 stage / СП "Мужская история" 6 этап

agosto 14, 2018 0 Comments
Всем привет!  
Сегодня, Myry с вами - спасибо за приглашение!  
Это завершающий этап СП "Мужская история", и качестве приглашенный дизайнер 
Я делаю обложку альбома с ОЭ - звезда + надпись (название).  
Это не первый раз, когда я пишу на вашем языке, но вы можете исправить любые ошибки, которые вы видите которые помогают мне улучшить :)
¡Buenas gente!
Última etapa de este JV con el blog Yaroslavl Scrap-Club 
pero en esta ocasión como Diseñadora invitada. 
Para la ocasión teníamos que realizar la portada de nuestro álbum 
con "estrellas + título" cómo OE (elementos obligatorios).
Y si, esta entrada está -o estaba originalmente- en ruso.


Обычно не записываю видео, но сфотографировал рабочий процесс, чтобы вы могли видеть, как я работал. Я использовал ткань для покрытия крышки. 
Como veis, he hecho una portada de lo más típica, rectangular en este caso, forrada con tela.
Este álbum dispone de 6 hojas más las contraportadas.
El reto tenía 5 etapas + la dedicada a la portada. Dos páginas del álbum por cada etapa... 
sep, me sobran páginas pero intentaré hacerlas antes del día 23 para finalizar el reto.
Я использую мелкую древесину вместо картона и наклеиваю конверты на "позвоночник" с gummed paper tape (Я не знаю, как сказать это слово). 
He usado madera para hacer las tapas y sobres A5 (si mal no recuerdo), pegadas a la espina 
con cinta kraft engomada (se usa muchísimo en cartonaje y, aunque cuesta un poco 
de encontrar, es de lo mejor que hay si no quieres usar pegamento).
  
И теперь вам нужно украсить обложку альбома. 
La decoración es super sencilla.
 
Ну вот, почти все готово. Осталось выложить декор))
И обязательные элементы.
Estos son los OE que decidí usar.
Font by Marta van Eck Designs

Конечный итог!
Никогда бы не подумала, что такую стимпанк можно сделать сам 
¡Y así quedó mi portada mixed media steampunkeada!
o(≧ o ≦)o  
 
 
я обожаю создавать мужские работы, хоть и делаю это не часто.
Желаю вам вдохновения!
С вами была Мyry))
No es el primer trabajo de esta temática que hago peo creo que vamos mejorando.
La próxima vez será el álbum terminado, ¡o por lo menos las hojas que faltan!
¡Gracias por leer!