
Hi everyone!
Today I gonna show you how to make a masculine mini album without "masculine" supplies
using colors of the papers, chipboards and stamps.
(Tutorial en Español aquí)


Supplies
Wooden Mini Album
"Cozy Winter" paper collection
“Magic Day” stamps
Chipboard Lunar background
Chipboard Deco classic background
Chipboard Street map
Chipboard Bubbles frame
Chipboard Bubbles background
Kraft cardboard (300gr)
"Versafine" black ink and "Vintage Distress"
Dark or neutral colors ribbons
2 brads, 1 charm, 1 eyelet, 1 turn mount, 2 paper clips and some die-cuts
Before dismantling the album measure the with to be able to make the structures.
Remember in what order the covers and the sheets are placed for their later assembly.

Choose what papers you can use so it will be easier to decide the number of pages to make.
I've discarded papers with Christmas motives and reserved the houses paper for fussy cutting.

I'm going to make eigth pages, two glued on the back covers and the other ones doubles, glueing sheet with sheet. The rest of the sheets I will be used to make the structures alternating with kraft cardboard.

Remember to correctly place the direction of the holes so that when glueing sheet with sheet
don't make mistakes.
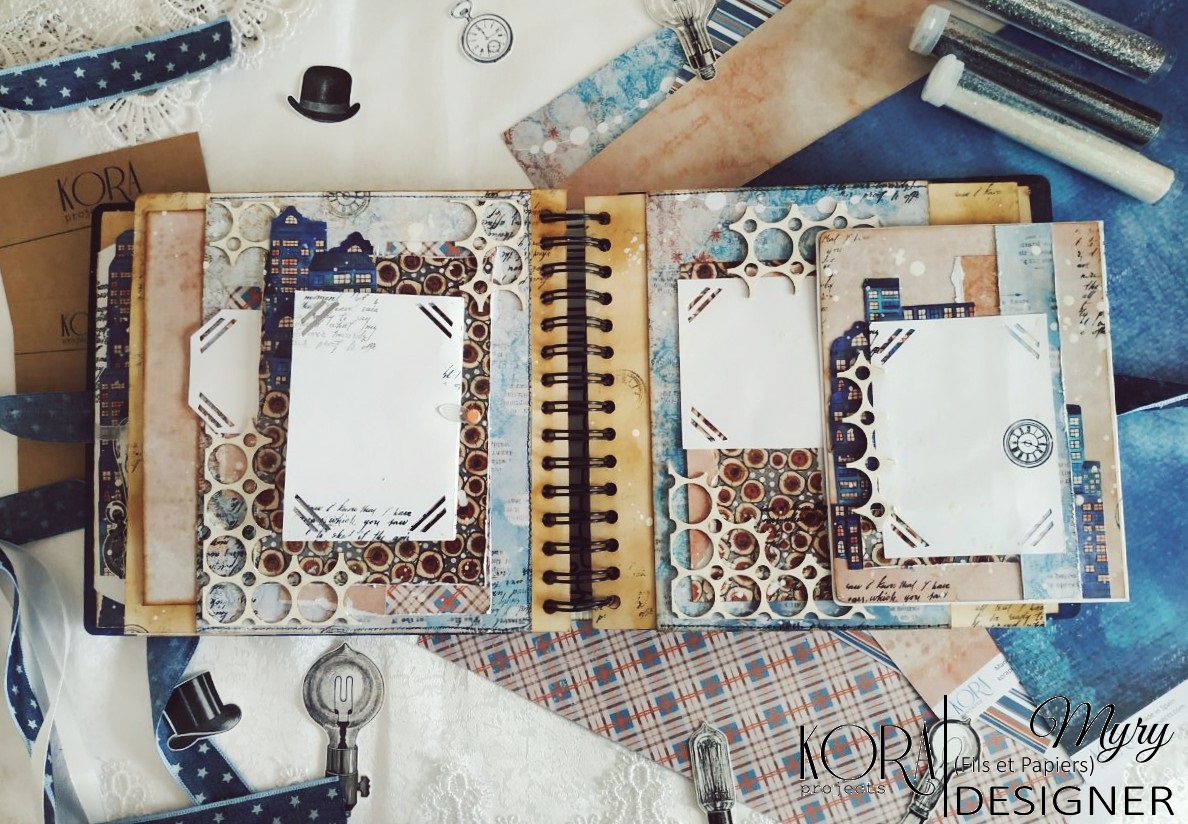
First page
Make a half circle flip with these measurements:


Glue the tab of the semicircle behind the sheet and glue a 11'5x14cm (4 1/2"x5 1/2") piece of scrap paper and all the decorative elements in the semicircle. Cover the back of the semicircle with a scrap paper.
Make a 8'5x29'5cm (3 3/8"x11 5/8") accordion fold and score at 7'5cm (2 15/16");
put the chipboard where you like and glue everything; use one paper clip for close.

You can use an envelope or do it with a 16'2x29'2cm (6 3/8"x11 1/2") sheet. I've make it and cut only
the pieces that will be visible. I use stamps, chipboard, die cuts and scrap paper to decorate the page.

Use the eyelet, a brad and two ribbons of 40cm and 45cm (15 3/4" and 17 3/4") to close the page
and another of 45cm (17 3/4") for the envelope.

Only glue this page behind to the cover when it's finished.
NOTE: The binding will be something special. I'm going to cut the line of holes but
I recommend you not to cut it until you check how it will look like in order to decided how do you want it.
Second page
Cut a 14x14cm (5 1/2"x5 1/2") piece of cardboard and score at 2cm and 2'3cm (13/16" and 1/8") on the top to make a tab with a little space. Cut two pieces of 7'5x11cm (2 15/16"x4 5/16") scrap paper, one of 11'5x13'5cm (4 1/2"x5 5/16") and another of 16'5x18cm (6 1/2"x7 1/8").

Put all the decorative elements on the sheet before gluing them together with the largest scrap piece.
Then glue the cardboard and cover the tab with the middle scrap piece and put the small pieces too
with the rest of the elements. Remember not to glue the part of the chipboard that will be on top
of the site for the photo so that get in without problems.

Third page
Cut a 18'5x30'5cm (7 5/16"x12") scrap paper and score at 12'7cm and 12'9cm (5" and 5 1/16") on one side.
Rip the paper up and reserve that piece. Cut two pieces of 7x11cm (2 3/4"x4 5/16") cardboard.

Put where you want all the elements and glue them before starting with the back. Glue the other piece
of cardboard so that it covers the back of the first piece. Make a pocket with the piece that you reserved.
Cut 12x12cm and 9x13'7cm (4 11/16"x4 11/16" and 3 9/16"x5 3/8") pieces of cardboard and score them in half.
For close it use the other paper clip and the charm, but keep it open in the pocket.

Once you have all the structures finished, cut two ribbons of 35cm (13 13/16").
You can sew them or glue them to the sheet. Finally glue the page to the sheet.
Fourth page
Make another flip with a 18'2x20'5cm (7 3/16"x8 1/16") scrap paper, score at 2cm and 2'5cm (13/16" and 1")
for the top and rip the lower part. Cut two pieces of 7'8x9'6cm (3 1/16"x3 13/16") cardboard,
some pieces of chipboard and other decorative elements, and put them where you like.
 Behind the flip glue four pieces of 7x9cm (2 3/4"x3 9/16") cardboard and decorate the base of the page
with remains of papers, tags, chipboard...


Fifth page
Make an open pocket just for one side with a 15x20cm (5 15/16"x7 7/8") scrap paper for a 13x18cm (5 1/8"x7 1/8") tag. I've sewn it on the sheet but you can make tabs and glue them.

with cardboard, score it in half and decorate only the side that will be outside the panel.


 Put some paint drops doing and blur the paint with the help of the sponge making a gradient.
 Now wet your fingers with water and just spread the colors.
This is optional but I love how it looks. You can throw the glitter before the paint dries.
 Once dry, splash with white paint. The last step will be to varnish the surface to protect the paint.
 Once the varnish has dried, repeat the same process from the back covers.
I recommend to decorate the cover after binding the album.


I prefer to make a spine and hide the wire.
First, put the finished pages with two "in white", one at the beginning and one at the end.

To make the spine put the leaves together with the covers and measure the width of the album, in this case 5'5cm (2 3/16"). Cut a 15'5x20'5cm (6 1/8"x8 1/16") piece of watercolor paper of 300gr, make two marks to 5cm (8 1/4") of each side and score inside to 5mm (3/16").

Cut two ribbons of 43cm (16 15/16") and glue them in the middle of each cover (at 10'5cm or 4 1/8"). You can also sew or staple them if you have the proper needle or a special stapler to drill more than 5mm (3/16").

Join the covers leaving the space of the spine, center it well and glue it, let dry for a few hours.


 Now you can glue the last two pages and finish decorating your cover.
And we would have finished the album.
A little video about this mini album, of course.
And that's the way that you can make a mini album for a young men only with some chipboards
and playing with the colors of the papers.
Thank you very much for reading this post soooo long.
I hope you liked it and that it will help you.
Have a good week and see you in the next post.
With this mini album I participate in to the following challenges:


for the top and rip the lower part. Cut two pieces of 7'8x9'6cm (3 1/16"x3 13/16") cardboard,
some pieces of chipboard and other decorative elements, and put them where you like.

with remains of papers, tags, chipboard...


Fifth page
Make an open pocket just for one side with a 15x20cm (5 15/16"x7 7/8") scrap paper for a 13x18cm (5 1/8"x7 1/8") tag. I've sewn it on the sheet but you can make tabs and glue them.

Cut a 10'5x14'8cm (4 1/8"x5 13/16") piece and glue it on the pocket but leave a space without glue for another mini pocket for a 5'5x9'5cm (2 3/16"x3 3/4") tag. Then glue a 11x29cm (4 5/16"x11 7/16") accordion fold
and close it with the turn mount and the other brad.
Sixth page
Make a panel with a 13x22'5 (5 1/8"x8 7/8") piece of scrap paper and score at 2cm and 2'2cm (13/16" and 7/8") both above and below to create tabs. Make a large tag 17x25'7cm (6 11/16"x10 1/8") with cardboard, score it in half and decorate only the side that will be outside the panel.

Also decorate the panel with two pieces of 8x10'5cm (3 3/16"x4 1/8") cardboard, scrap papers, chipboard...
Seventh page
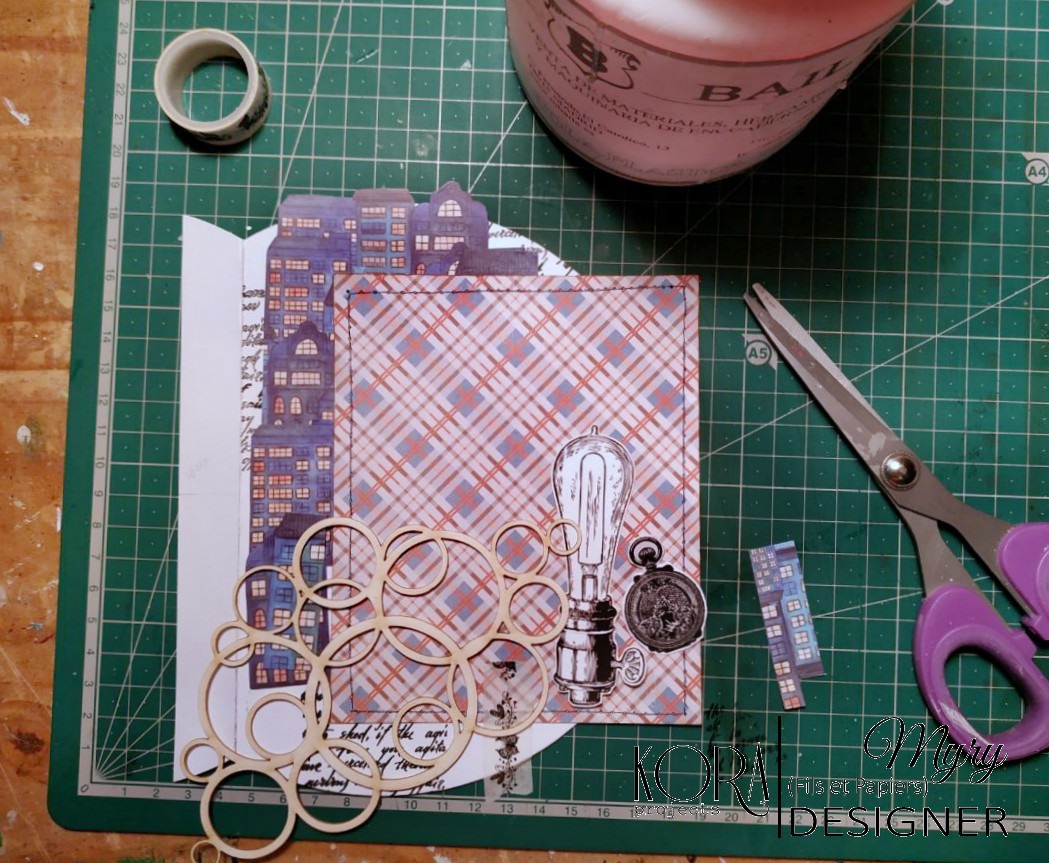
Make a frame flip for two photos. Cut a 22x12'8cm (8 11/16"x5 1/16") piece of cardboard and score at 2cm
and 2'5cm (13/16" and 1") by the top. Then cut these figure on scrap paper:


Once you have cut the circles and scored the tabs, center the frame and glue it on the cardboard.
If you don't want to see the cardboard you can glume scrap paper before glue the frame.
When you finished, glue the flip to the sheet.

Glue two pieces of 7'5x10'5cm (2 15/16"x4 1/8") scrap paper behind the flip. Cut another piece of 17'5x19'5cm (6 7/8"x7 11/16"), two pieces of 6'5x7'2cm (2 9/16"x2 13/16") of another of 10x13'5cm (3 15/16"x5 5/16") cardboard; glue them on the scrap paper.
Last page
For the last page cut two pieces of 13'5x14cm (5 5/16"x5 1/2") cardboard and score them at 2cm and 2'5cm (13/16" and 1") on one side. Cut a 17'5x19'5cm (6 7/8"x7 11/16") piece of scrap paper
and put the pieces of cardboard as a window.
To decorate I used stamps and street map chipboard cut in half.

Make a pocket of 8x19'5cm (3 3/16"x7 11/16") leaving a margin of 2cm (13/16") at the base and 1cm
(3/8") at the sides. You can keep some tags inside.
Now cut two ribbons of 35cm (13 13/16") and glue or sew them to the sheet.

Then you can glue the page to the sheet but only glue this behind to the back cover when it's finished.
NOTE: Remember, the binding will be something special. I'm going to cut the line of holes but
I recommend you not to cut it until you check how it will look like in order to decided how do you want it.
Cover and back cover
Use acrylic paint: black, white and blue (I use purple, pure and cerulean shades of blue); varnish, sandpaper, sponge and brush, and glitter. First, check if the covers needs a sanding before painting.


This is optional but I love how it looks. You can throw the glitter before the paint dries.


I recommend to decorate the cover after binding the album.
I'm going to make a very simple decoration with these chipboards:
I'm going to paint the little houses, glue from behind a little piece of yellow acetate and then
glue white cardboard to show the yellow.

Binding
You can do it in two ways. The simplest is to put the leaves and covers in the wire and glue the pages that were left to the covers (if you don't cut the holes they should match the ones in the covers). I prefer to make a spine and hide the wire.
First, put the finished pages with two "in white", one at the beginning and one at the end.

To make the spine put the leaves together with the covers and measure the width of the album, in this case 5'5cm (2 3/16"). Cut a 15'5x20'5cm (6 1/8"x8 1/16") piece of watercolor paper of 300gr, make two marks to 5cm (8 1/4") of each side and score inside to 5mm (3/16").

Cut two ribbons of 43cm (16 15/16") and glue them in the middle of each cover (at 10'5cm or 4 1/8"). You can also sew or staple them if you have the proper needle or a special stapler to drill more than 5mm (3/16").

Join the covers leaving the space of the spine, center it well and glue it, let dry for a few hours.

You can paint the spine with the same tones as the covers. If you want to hang some charm is time to do it. Once dry, put the wire right in the center of the spine and try to it the leaves "in white" covering the tabs
of the spine. Check many times as you need that the album opens up well, that it is centered...
Just glue the leaves when you are sure that everything is in place.


And we would have finished the album.
A little video about this mini album, of course.
and playing with the colors of the papers.
Thank you very much for reading this post soooo long.
I hope you liked it and that it will help you.
Have a good week and see you in the next post.
With this mini album I participate in to the following challenges:


Интересный, динамичный альбом! Спасибо, что поделились процессом создания с ВСК )
ResponderEliminarБольшое спасибо))
EliminarEste álbum es precioso!! Me encanta. Es divino. Pura magia. Con tantos detalles. Original. Cuánto trabajo puesto en el. Cuanta originalidad. Es bellísimo!! Felicidades un gran trabajo.
ResponderEliminar¡Muchas gracias! Me alegra saber que te gustó ^^
EliminarЗамечательный альбом! Долго разглядывала, много интересных деталей.
ResponderEliminarСпасибо от Арт-Кладовой за участие в задании.
Большое спасибо))
EliminarWonderful album!
ResponderEliminarThanks from Арт-Кладовая
Thanks so much!
EliminarЧасики прекрасно дополняют этот альбом. Спасибо, что творите вместе с Katrin craft!
ResponderEliminarБольшое спасибо))
EliminarКакая чудесная работа! Очень интересно было посмотреть, как она создавалась. Спасибо, что творите с нами! Команда Katrin craft.
ResponderEliminarБольшое спасибо))
Eliminarочень познавательно! спасибо за мк и за участие в заданиях Katrin craft!
ResponderEliminarБольшое спасибо))
EliminarОчень понравился альбомчик! Как приятно смотреть на процесс создания)! Смотрела долго и внимательно, наслаждалась!) Спасибо за участие в нашем задании от Katrin craft!)
ResponderEliminarБольшое спасибо))))
EliminarСпасибо за такой подробный МК. Алтьом получился прекрасный. Очень мужской, многодетальный, но и в то же время не перегруженный декором. Спасибо от ВСК за участие в нашем задании
ResponderEliminarБольшое спасибо))
EliminarПотрясающий альбом! Каждую страничку можно долго рассматривать, находя новые элементы! Спасибо что творите с АРТ-КЛАДОВОЙ)
ResponderEliminarБольшое спасибо!
EliminarОчень интересный альбом, особенно понравилось ночное небо!!!! Спасибо за участие в нашем задании от блога Арт-кладовая!
ResponderEliminarБольшое спасибо ^_^
Eliminar